If you’ve set up OpenClaw and it’s just sitting there answering questions, you’re only using half of it. Skills are what turn it from a chatbot into an agent that actually does things.
This post covers two things: installing a skill from ClawHub (using Notion as the example), and building a custom skill from scratch. By the end you’ll know exactly how skills work under the hood and how to write one that does whatever you need.
📺 Prefer to watch? Full walkthrough on YouTube: [link here]
What a Skill Actually Is
Before installing anything, it’s worth being clear on what a skill is — because it’s easy to confuse with tools.
Your agent already has tools. It can browse the web, run code, call APIs. But tools are just capabilities. Having a hammer doesn’t mean you know when to swing it.
A skill is the instructions. It tells the agent when to use its tools, how, and in what order. Without one, the agent is guessing every time you send a message.
Technically, a skill is a directory containing a SKILL.md file. That file has YAML frontmatter at the top (name, description, requirements) and a body with instructions the agent follows when the skill is active.
How OpenClaw Loads Skills
Here’s something that matters a lot when you’re writing your own skills. When your session starts, OpenClaw doesn’t load the full content of every skill you have. It only reads the name and description of each one. The full instructions stay on standby.
When you send a message, the agent reads those descriptions, decides which skill is relevant, and only then pulls in the full content.
That means your description field does more work than any other line in the file. It’s what triggers the skill — or buries it.
Installing a Skill from ClawHub
ClawHub is the public skill registry for OpenClaw — think of it like an app store, but for your agent. It has over 13,000 published skills covering everything from note-taking to database queries to browser automation.
We’re installing the Notion skill because it’s a good real-world example: it involves an API token, a third-party integration, and a practical use case.
Install the Skill
clawhub install notionThis downloads the skill files into your workspace. Verify it’s there:
openclaw skills listA quick security note: ClawHub is open — anyone can publish a skill. Before installing anything, check who created it, look at the GitHub source, and check the security analysis tab on the ClawHub page. Stick to skills with known authors and healthy install counts. The registry has automated scanning in place, but reviewing before installing is still good practice.
Configuring the Notion Integration
Installing the skill is only half of it. You also need to give it access to your Notion workspace.
Create a Notion Integration
Go to notion.so/my-integrations and create a new connection.
- Name it
openclaw(this is the name you’ll use when granting page access later) - Select the workspace you want OpenClaw to access
- Click Create
Copy the Internal Integration Token from the configuration page.
Store the Token Securely
Don’t paste the token directly into the skill file. Instead, save it to the .config directory under your OpenClaw workspace:
# Create the config directory if it doesn't exist
mkdir -p ~/.openclaw/workspace/.config

# Save the token
echo "your_notion_token_here" > ~/.openclaw/workspace/.config/notion_api_key
The skill is already set up to look for this file. No hardcoded secrets.
Connect OpenClaw to Your Notion Pages
The skill has access to your token, but Notion still won’t let it touch your pages until you explicitly grant access.
Open the Notion page or database you want OpenClaw to work with. Click the three-dot menu → Add connections → find the integration you named openclaw.
You’ll need to do this for every page or database you want the agent to access.
Testing the Notion Skill
Open your channel (Telegram in this case) and start a new session:
/newThe Notion skill should now appear in the skill list at the top of the session.
Here’s the use case: I have a database of recipes I save when I’m browsing. Instead of opening Notion every time, I want to tell OpenClaw to save a recipe for me — just give it the name and any details, and it handles the rest.
Send a message asking it to save a recipe. If it doesn’t work at first, double-check that you added the connection on the Notion side — that’s the most common thing to miss.
Building a Custom Skill
Now let’s build one from scratch. The ClawHub skill showed you the pattern — now you own it.
The Use Case
I collect and trade Flesh and Blood cards — a collectible card game. I want two skills:
- Deck fetcher — grab a decklist from a URL on Fabrary
- Price checker — browse card marketplaces and pull sold prices for each card in the list
Create the Skill Directories
Each skill lives in its own folder inside ~/.openclaw/workspace/skills/:
mkdir -p ~/.openclaw/workspace/skills/fab-deck-fetcher
mkdir -p ~/.openclaw/workspace/skills/fab-price-checker

touch ~/.openclaw/workspace/skills/fab-deck-fetcher/SKILL.md
touch ~/.openclaw/workspace/skills/fab-price-checker/SKILL.md
Write the SKILL.md Files
Here’s what a minimal custom skill looks like:
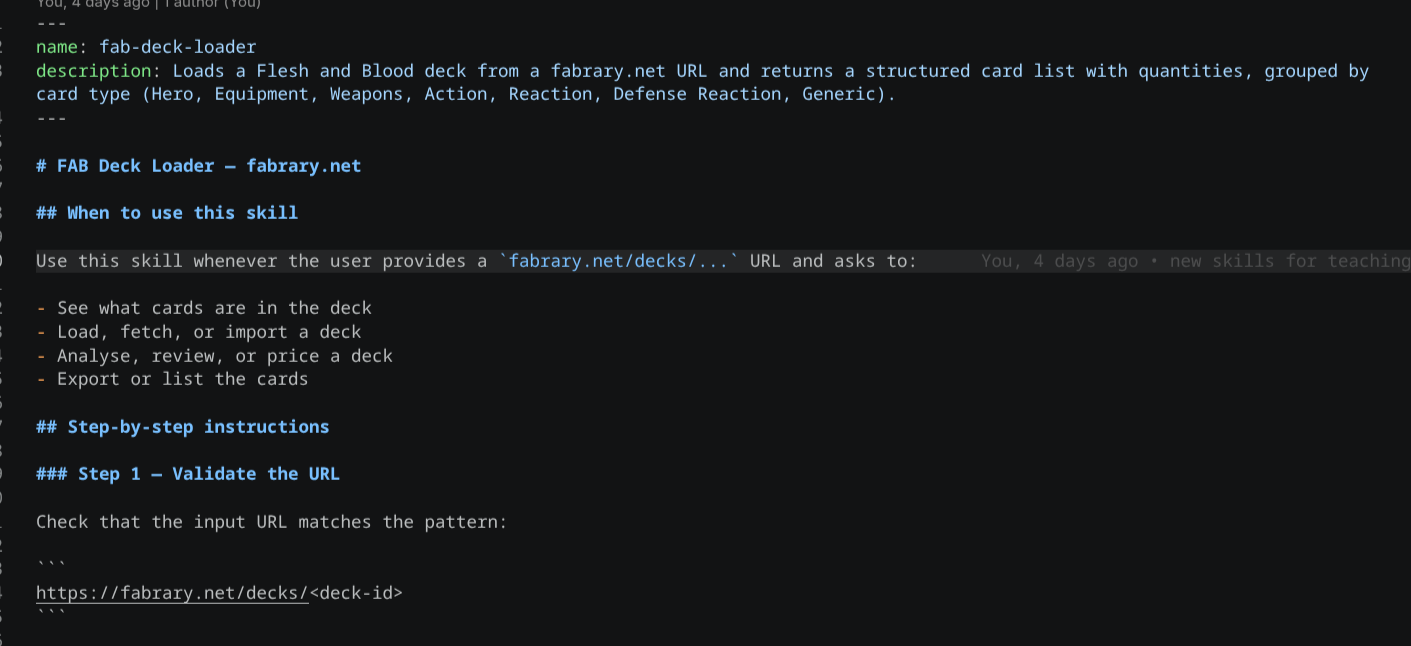
---
name: fab-deck-fetcher
description: Fetches a Flesh and Blood decklist from a Fabrary URL provided by the user
version: 1.0.0
---

# Flesh and Blood Deck Fetcher

Use this skill when the user provides a Fabrary URL and asks to get or view a decklist.

## Instructions

1. Use the browser tool to open the provided URL
2. Extract the card names and quantities from the decklist
3. Return the full list formatted as: `[quantity] x [card name]`
4. Confirm the total card count with the user
---
name: fab-price-checker
description: Checks current market prices for Flesh and Blood cards using sold listing data
version: 1.0.0
---
# Flesh and Blood Price Checker
Use this skill when the user asks for prices or market value of Flesh and Blood cards.
## Instructions
1. For each card provided, search for recent sold listings
2. Pull sold prices from available marketplace data
3. Return a summary with card name and estimated price range
4. Note that prices are based on sold listings and may not reflect current buy-it-now pricesA few things worth calling out on these files:
The description field — this is the one line the agent reads to decide if this skill applies. Be specific. “Fetches a Flesh and Blood decklist from a Fabrary URL” is much better than “gets card data.” The more specific it is, the less likely it fires on the wrong message.
The instructions body — write it like you’re onboarding a new hire. Step by step, explicit about what to look for and what to return. The agent will follow these instructions literally.
Register and Restart
openclaw skills list         # confirm both skills appear
openclaw gateway restart     # load them into the active session
Start a new Telegram session:
/newBoth skills should appear in the list.
Testing the Custom Skills
Deck Fetcher
Grab a random decklist URL from Fabrary and ask OpenClaw to get it.
You’ll notice it mentions needing a browser — that’s the browser tool doing the work behind the scenes. I’ve already installed Playwright with Chromium on this server to support that. If you want a walkthrough on that setup, drop a comment and I’ll cover it.
Price Checker
Ask OpenClaw to check prices for the cards from the decklist.
The results will be based on sold listing data rather than active listings — so you’re getting historical sold prices rather than what sellers are currently asking. For estimating market value and deciding what to restock or offload, this is actually more useful than asking prices. Active listings can be wildly optimistic.
Quick Reference: SKILL.md Structure
---
name: your-skill-name
description: One clear sentence — this is what the agent reads to match the skill
version: 1.0.0
requirements:
  env:
    - YOUR_API_KEY # if the skill needs an env variable or token
---

# Skill Title

Brief description of what this skill does and when it applies.

## Instructions

Step-by-step instructions the agent follows.
Be explicit. The agent reads this literally.

## Notes (optional)

Any caveats, edge cases, or things the agent should know.| Field | What it does |
|---|---|
name | The skill’s identifier — used by openclaw skills list |
description | The most important line. Determines when the skill is triggered |
version | Useful for tracking changes, especially if you publish to ClawHub |
requirements.env | Declares env variables or config files the skill depends on |
What’s Next
You now have the full skill pattern: install from ClawHub, wire up a third-party integration, and write your own from scratch.
The natural next step is browser automation — getting OpenClaw to interact with pages that need JavaScript to load. If that’s useful, drop a comment and I’ll cover it.
Questions? Leave them below.